rhubarb, lemon, and vanilla pie

This time of year I’m usually gifted with large bags of rhubarb by assorted friends and family.  I love the stuff but sometimes feel like I’m running out of things to do with it.  Not so.  Though I’ve made several different kinds of rhubarb pie seen here and here and here, I still managed to find another rhubarb pie recipe that intrigued me.

5.27.13 002

Lemon zest and juice and vanilla extract along with a bit of freshly grated nutmeg get added to the otherwise typical rhubarb filling.  Genius!  So simple, but so good.  Next time I may actually add a little fresh vanilla bean along with the extract just to deepen the vanilla flavor.

5.27.13 004

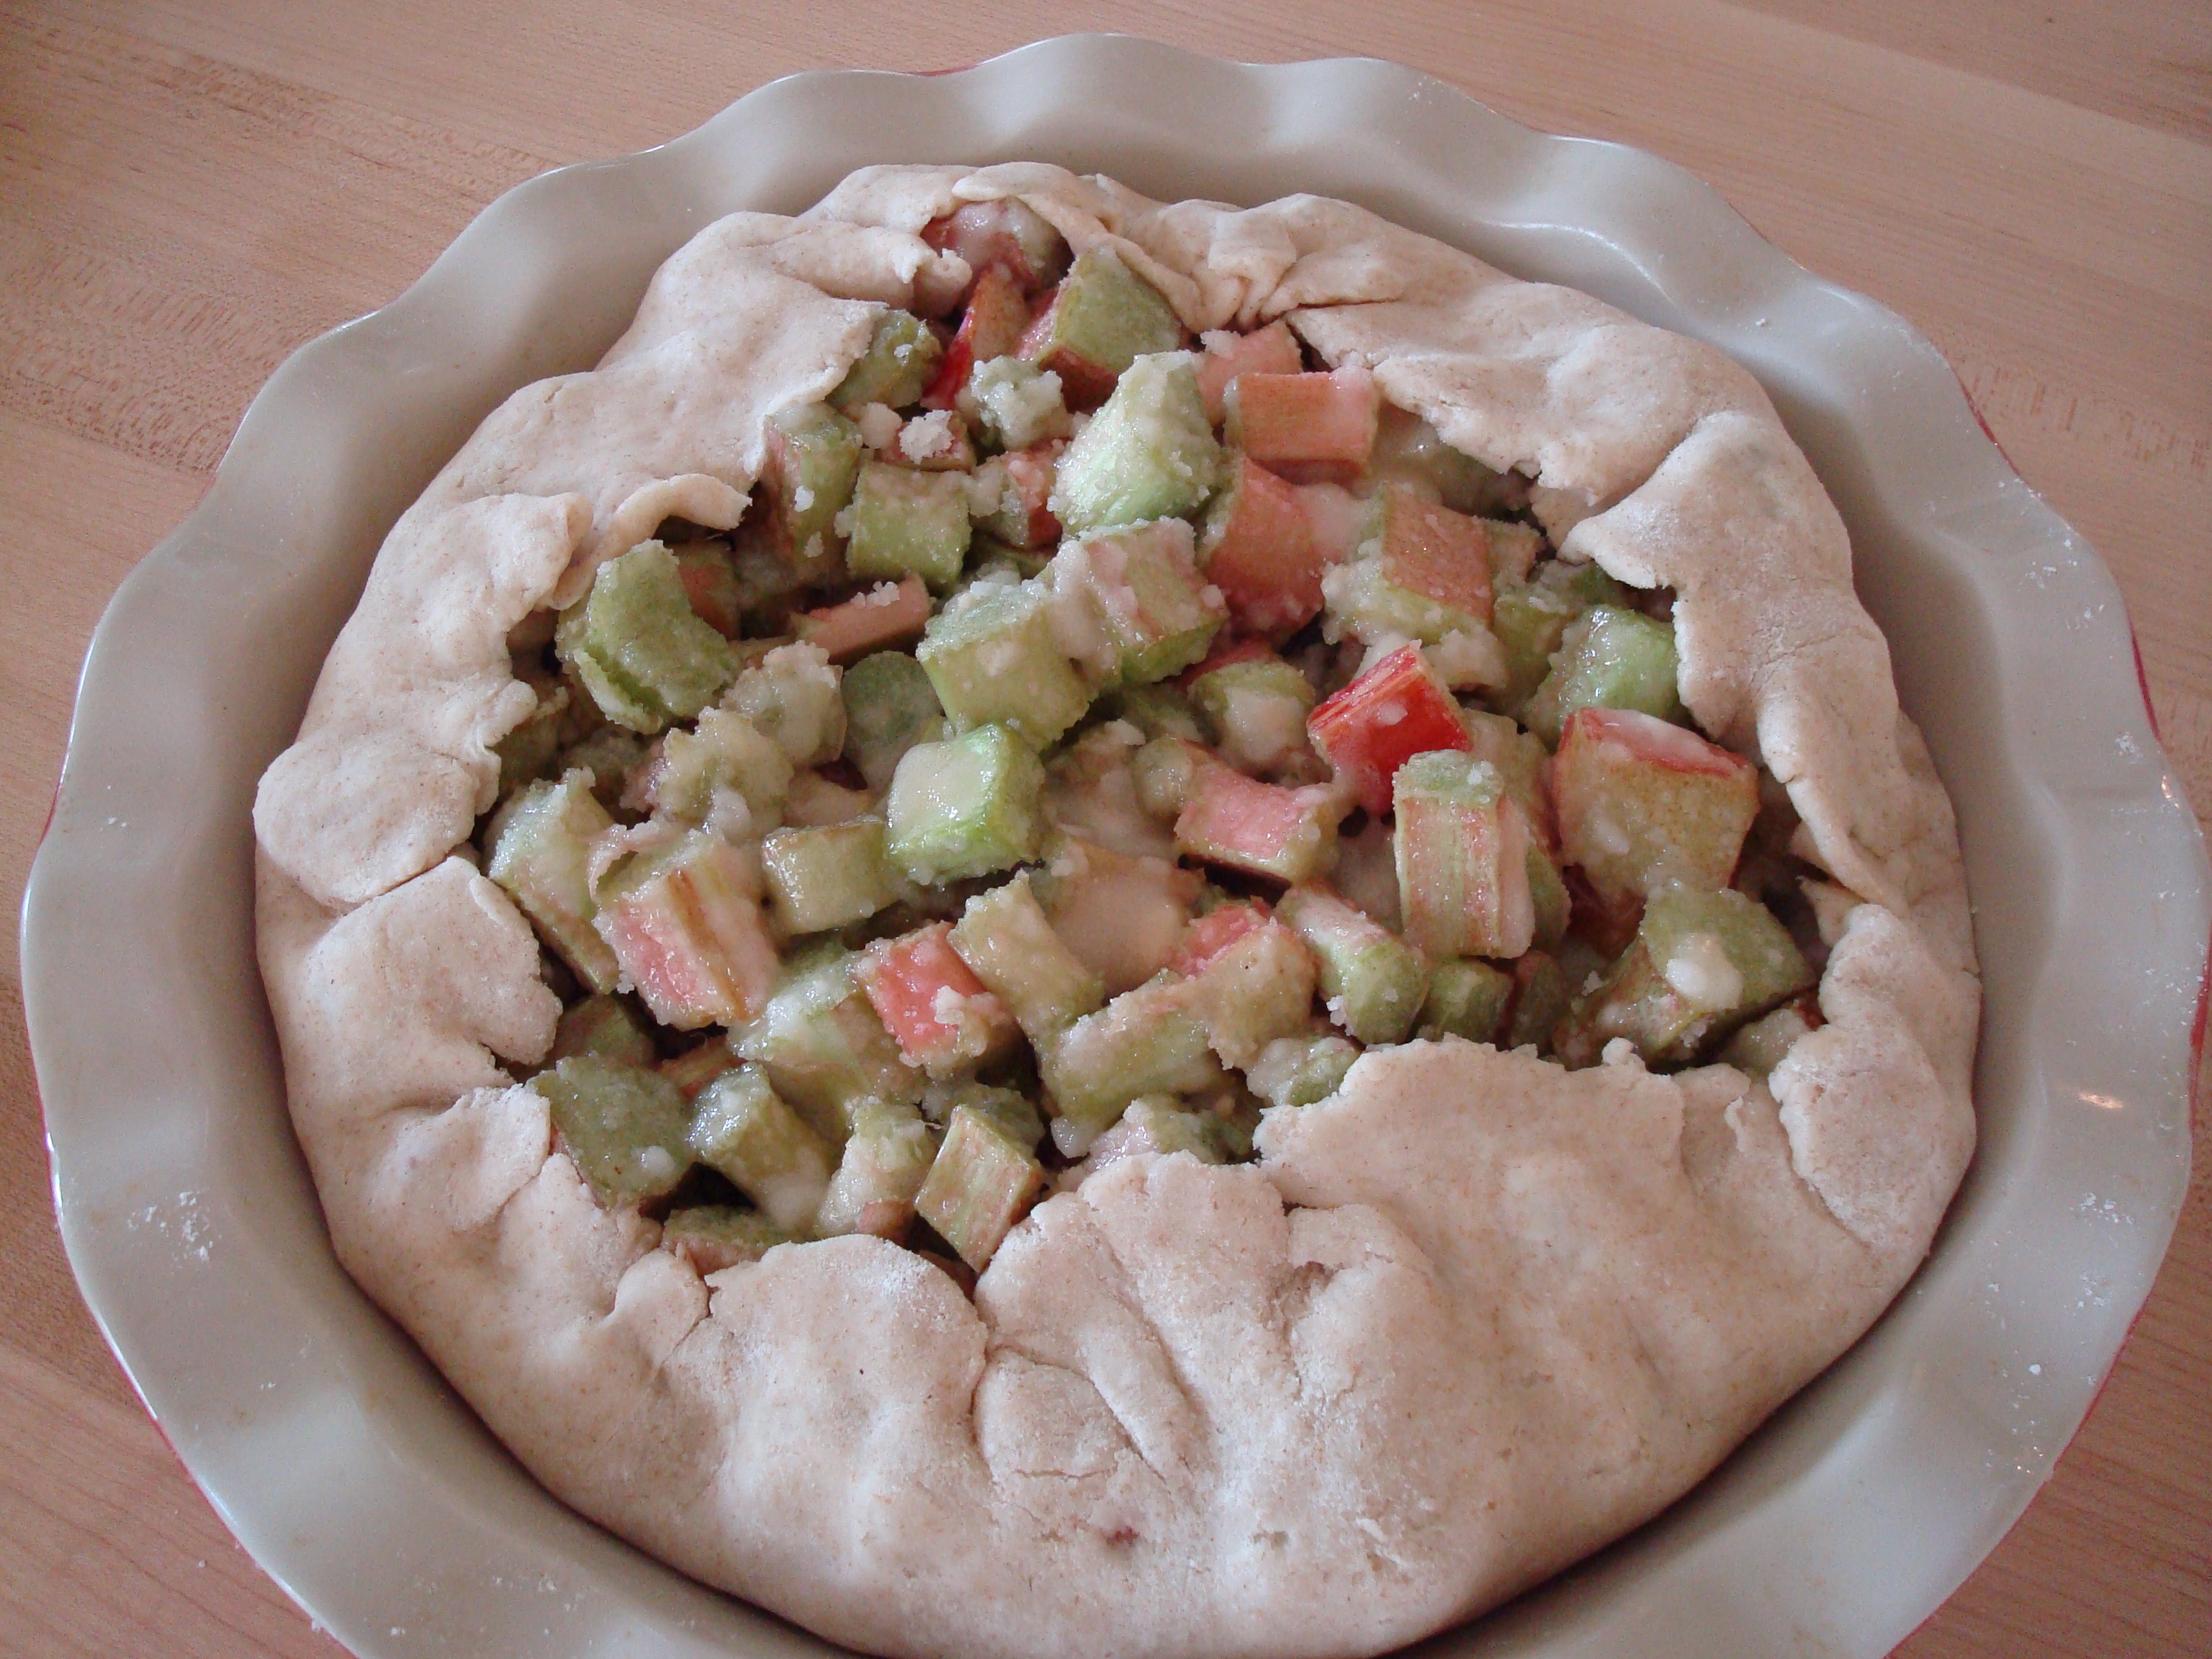
I had big plan for doing a fancy lattice top to this pie but was short on time so did what my mom calls a “flopover” pie.  You simply fold the edges of the crust over the top of the filling.  I’ve brought this style of pie to dinner parties before and people are always impressed and refer to it as a galette, which sounds much nicer than flopover.  Those French and their fancy words.

5.27.13 008

The lemon zest and juice pair so nicely with the rhubarb and the vanilla adds a little extra sweetness.  And it would’ve been so great with the mascarpone ice cream I made last week!  If only there were any left by the time I made the pie…

5.27.13 010

Rhubarb, Lemon, and Vanilla “Flopover” Pie (filling recipe from “A Year of Pies” by Ashley English)

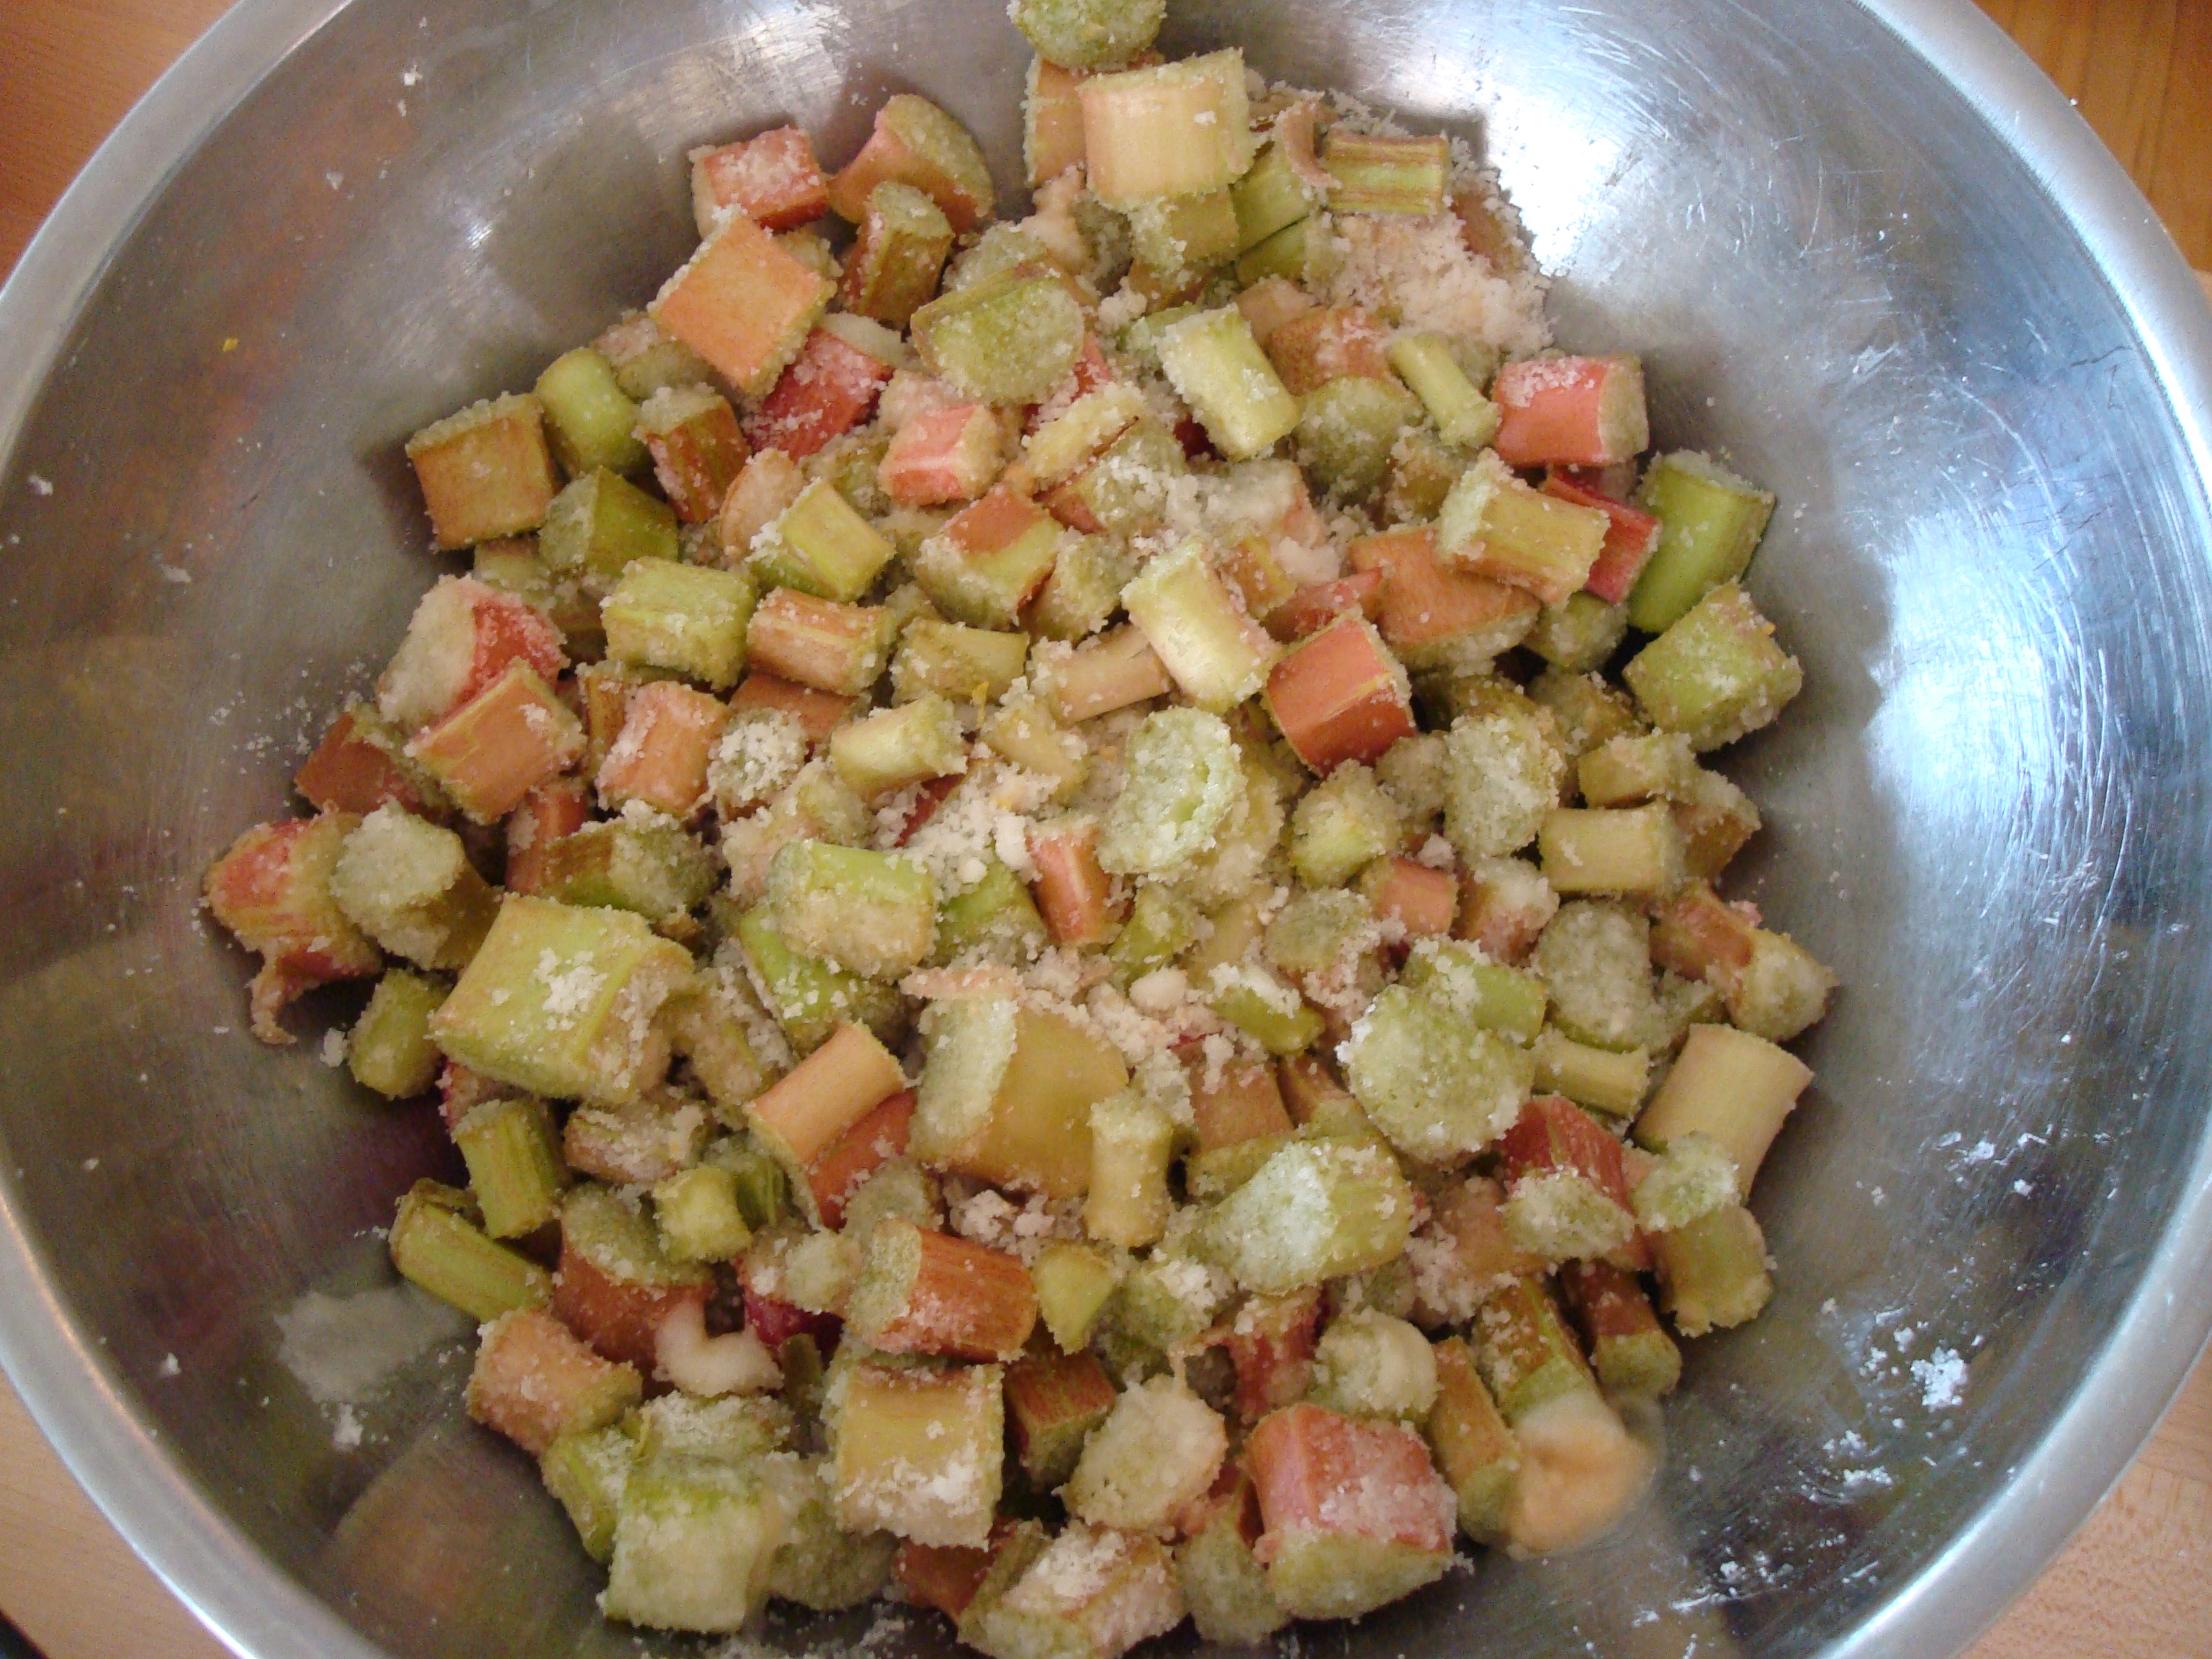
  • 1 1/2 pounds rhubarb (4 1/2 cups), trimmed and chopped into 1/2-inch pieces
  • 1 1/2 cups granulated sugar
  • 1/2 cup arrowroot powder or cornstarch
  • Grated zest and juice of 1 lemon
  • 2 teaspoons vanilla extract
  • 1/2 teaspoon freshly ground nutmeg

Preheat oven to 425.

Place the chopped rhubarb, sugar, arrowroot or cornstarch, lemon zest and juice, vanilla extract, and nutmeg in a medium-size bowl.  Stir together with a large spoon until well combined.

Pour the rhubarb filling into the prepared crust (see below).  Fold crust over the top of the pie.  Cover crust with aluminum foil to prevent it from browning too quickly.  Remove foil for last 15 minutes of baking.  Bake for about an hour, until the crust is golden and juices are bubbling in the center of the pie.

One Crust Pie Pastry (from Betty Crocker’s Cookbook)

  • 1 cup all-purpose or unbleached flour
  • ½ teaspoon salt
  • 1/3 cup plus 1 tablespoon shortening
  • 2 to 3 tablespoons cold water

Mix flour and salt in medium bowl.  Cut in shortening, using pastry blender or crisscrossing 2 knives, until particles are size of small peas.  Sprinkle with cold water, 1 tablespoon at a time, tossing with fork until all flour is moistened and pastry almost leaves side of bowl (1 to 2 teaspoons more water can be added if necessary).

Gather pastry into a ball.  Shape into flattened round.  If desired, wrap flattened round of pastry in plastic wrap and refrigerate about 30 minutes to firm up the shortening slightly, which helps make the baked pastry more flaky and lets the water absorb evenly throughout the dough.

Roll pastry on lightly floured surface, using floured rolling pin, into circle 3 inches larger than upside-down pie plate.  Fold pastry into fourths and place in pie plate; or roll pastry loosely around rolling pin and transfer to pie plate.  Unfold or unroll pastry and ease into plate, pressing firmly against bottom and side and being careful not to stretch pastry, which will cause it to shrink when baked.

cranberry, pear, and ginger chutney

Why do cranberries only get love around Thanksgiving time?  I guess dried cranberries have sort of become a thing over the past decade or so (thanks Craisins) but fresh cranberries need to take center stage more often, too.  Why?  Because they are beautiful and delicious.

11.22.12 021

I don’t think I was ever subjected to old-school cranberry sauces (of the jelly mould variety) in my youth, and if I was I must have blocked it from memory.  As an adult I’ve become quite fond of cooking cranberries down into chutneys to serve with turkey or spread on sandwiches.  I thought I had a winner of a recipe in years past until I tried this one this year.  This one involves pears, ginger, lemon and orange zest, cinnamon, cloves, and shallots.  It’s a whole lotta beautiful in a bowl.

11.22.12 185

Once you’ve cooked the cranberries long enough they start to soften and burst and become wonderful.  Yes I made this chutney for Thanksgiving but I totally think it would be good any time of year that you are able to find fresh cranberries.  When paired with a little Brie cheese it makes an out-of-this-world grilled cheese.  Trust me on this one.  It would also make an excellent addition to a burger off the grill  in the warmer months or an excellent accompaniment to a cheese plate with some crackers, grapes, and candied nuts.  Dream big.  Just don’t save it for only one day a year.

11.22.12 068

Cranberry, Pear, and Ginger Chutney (modified slightly from recipe found at www.epicurious.com)

  • 2 cups apple cider vinegar
  • 1 cup finely chopped shallots
  • 1/4 cup finely chopped peeled fresh ginger (from about 2-ounce piece)
  • 2 1/2 teaspoons finely grated lemon peel
  • 2 1/2 teaspoons finely grated orange peel
  • 1 cinnamon stick, broken in half
  • 1/4 teaspoon ground cloves
  • 1 12-ounce bag fresh cranberries
  • 1 1/4 cups (packed) golden brown sugar
  • 2 large firm Bosc pears (about 18 ounces total), peeled, cored, cut into 3/4-inch cubes (about 2 1/2 cups)

Combine apple cider vinegar, onion, ginger, lemon peel, orange peel, cinnamon stick pieces, crushed red pepper, and ground cloves in heavy large saucepan. Boil mixture until reduced to 1 1/2 cups, about 10 minutes. Add cranberries, brown sugar, and pears; stir over medium heat until sugar dissolves. Reduce heat to medium-low; cover and simmer until pears are very tender, berries collapse, and flavors blend, stirring occasionally, about 30 minutes. Remove from heat; discard cinnamon stick pieces. Using potato masher, mash mixture coarsely. Transfer chutney to bowl and cool. DO AHEAD: Can be made 3 days ahead. Cover and chill. Bring to room temperature before serving.

lemon pie bars

One of the awesome things about having a cooking/baking blog is that people start giving you things like fancy dishes and cookbooks as gifts.  My birthday happened to be a few weeks ago and I got both of plenty in spades which I’m super excited about.  One of the cookbooks I was given was by the people behind Back in the Day Bakery in Savannah, Georgia.

I’ve never been to Savannah, much less this bakery, but I know that southerners know good food and the cookbook received rave reviews so I added it to my amazon wishlist.  And boy, am I glad I did!

Last Sunday I was feeling a little l-a-z-y but wanted to bake a few things to share with you fine people so I looked for a simple recipe and this is it.  There are few ingredients and the steps involved were low maintenance, but the results?  Delicious.  People who aren’t normally into lemon-flavored baked goods even enjoyed these bars.

Lemon Pie Bars (from “Bake in the Day Bakery Cookbook” by Cheryl Day and Griffith Day)

For the crust:

  • 3 cups graham cracker crumbs (approximately 24 crackers)
  • 12 tablespoons (1 ½ sticks) unsalted butter, melted
  • 2 tablespoons sugar

For the filling:

  • 1 cup heavy cream
  • 2 teaspoons grated lemon zest
  • 1 cup fresh lemon juice
  • Two 14-ounce cans sweetened condensed milk
  • 6 large egg yolks

Position a rack in the middle of the oven and preheat the oven to 350 degrees F.  Grease a 9-by-13-by-2-inch baking pan and line with parchment, allowing the ends of the paper to hang over two opposite edges of the pan.

To make the crust: in a medium bowl, combine the graham cracker crumbs, butter, and sugar and blend with a fork until the crumbs are evenly moistened.  Press the graham cracker mixture firmly and evenly into the bottom of the prepared pan.  Use a piece of parchment to press on the crust with the palm of your hands to make sure it is completely level.

Bake the crust for about 8 minutes, until lightly golden.  Let cool completely before adding the filling.  Turn the oven temperature down to 325 degrees F.

To make the filling: in a large bowl, whisk together the heavy cream, lemon zest, lemon juice, sweetened condensed milk, and egg yolks.  Pour the filling over the cooled crust.

Place the baking pan inside a larger baking pan and pour enough hot water into the larger pan to come halfway up the sides of the smaller pan.  Bake for 20 to 25 minutes, until the filling is puffed at the edges and no longer jiggles in the center when the pan is tapped.  Remove the pan from the water bath and set it on a rack to cool for 1 hour, then refrigerate until cold.

Cut into squares and serve chilled, with whipped cream.  The bars will keep in an airtight container in the refrigerator for up to 3 days.

Baked Tilapia Fillets in Lemon-Soy Vinaigrette

When I used to live in Brooklyn there was a great farmer’s market in my neighborhood on Saturday mornings.  I would get up early, hit the gym, and on the walk home pop into the market and pick up fresh produce and flowers.  There was also a family stand there that sold fresh caught fish which used to intimidate the heck out of me until I realized that fish is the easiest thing on earth to cook.  I found one stellar flounder recipe that I would make frequently back then and had completely forgotten about it until I found myself with tilapia in my freezer leftover from my fish taco experiment.  Tilapia is a white fish just like flounder so I figured it would work and it sure did.

Prep time takes all of 4 minutes and the fish only needs to bake for about 7 minutes and voila, there you have it.  Dinner in under 15 minutes.  Way better than takeout!

Baked Tilapia Fillets in Lemon-Soy Vinaigrette (adapted slightly from recipe found at www.epicurious.com)

  • 2 6-ounce tilapia fillets (can also use flounder as recipe originally intended)
  • 1 garlic clove, minced
  • 2 tablespoons fresh lemon juice
  • 2 teaspoons soy sauce
  • ½ teaspoon sugar
  • ½ teaspoon salt
  • 2 tablespoons olive oil

Preheat oven to 450 degrees.

Arrange fillets in a ceramic or other baking dish just large enough to hold them in one layer.  In a small bowl combine the garlic, lemon juice, soy sauce, sugar, and salt.  Whisk in oil until emulsified and pour vinaigrette over fish.

Bake fish in middle of oven until just cooked through and no longer translucent, 5 to 7 minutes.

early spring pizza

Even though we’ve had some unseasonably warm temps over the past month, last Saturday marked the true beginning of spring for me: it was the first outdoor farmer’s market of the year in Madison.  The farmer’s market is my favorite thing about Madison and while it still takes place during the colder months it is moved indoors and is smaller and just not the same experience.  So you can imagine my excitement at this rite of yearly passage.

I foolishly decided to sleep in on Saturday and did not get to the market until peak time and then had to deal with the crowds.  I had to suppress my New York instincts when people would abruptly stop in front of me to admire some produce while I was trying my best to manuever around the square and get what I needed before the time on my parking meter ran out.  However, I managed to not yell at any of the sweet old ladies or adorable young families leisurely enjoying their day before me.  (But they really shouldn’t lollygag so much.  I’m just saying.)

There wasn’t a ton of variety at the market yet but I did manage to pick up some of early spring’s finest: ramps, green garlic, and rhubarb (more on that later in the week).  I have never worked with ramps or green garlic before but upon returning home with my bit of nature’s finery I promptly did some Googling and found a recipe for spring pizzas that involved ramps.  The green garlic part was inspired by a pizza I had eaten the previous weekend at a great local bakery/pizza place.  Done and done.

I added some soppressatta because I like cured meat and think it should be a part of most pizzas.  I just do.  But you could certainly make your version sans meat if you like and that is in fact how the original recipe had it.

The base for this pizza is ricotta mixed with a bit of lemon peel.  Super simple.  Separately you sautee the ramps and green garlic with olive oil and a bit of salt and then layer that over the ricotta mixture.  Then add the meat if you like and finish baking.  Once out of the oven add some fresh basil and parmesan and a drizzle of olive oil and there you have it.  Spring in pizza form.

(Side note: I should have photographed the cooked pizza before cutting into it.  It was not so pretty once a pizza cutter dug in and severed the basil leaves into smithereens so thus, no after picture.  My apologies.  This is real life though and sometimes these things happen.)

Pizza with Ricotta, Ramps, Green Garlic, and Soppressatta (adapted from Spring Pizzas recipe by Alex Guarnaschelli found at www.foodnetwork.com)

  • 1 pound pizza dough (I used the whole wheat pre-made dough at Trader Joe’s, good stuff)
  • All-purpose flour, for dusting
  • 2 tablespoons extra-virgin olive oil, plus more for brushing and drizzling
  • 6 ounces ramps, trimmed
  • 2 tablespoons chopped green garlic
  • Kosher salt
  • 10 slices soppressata or other cured meat, if desired
  • 1 cup ricotta cheese
  • 1 teaspoon grated lemon zest
  • Coarse sea salt
  • Coarsely ground black pepper
  • 1/4 cup fresh basil leaves
  • Grated parmesan cheese, for topping

Preheat the oven to 500 degrees F. Brush a baking sheet or pizza stone with olive oil. Stretch the dough into 12-inch round and place on the baking sheet or pizza stone and bake until golden, about 12 minutes.

Heat a large skillet over medium heat. Toss the ramps and green garlic with 1 tablespoon olive oil and season with kosher salt. Saute until ramps are just wilted, about 1 minute. Transfer to a cutting board and cut into pieces.

Mix the ricotta, lemon zest, the remaining 1 tablespoon olive oil and some sea salt and pepper in a bowl. Brush the crusts with olive oil (this will protect them from getting soggy), then spread with the ricotta mixture and season with sea salt. Top with the ramps, green garlic, and soppressata. Return to the oven until warmed through, about 2 minutes.

Top the pizzas with basil, parmesan and a drizzle of olive oil.